
By Helen | Chesapeake, Virginia
One of the most common questions I get from homeowners considering invisible induction is some version of: ‘Is this complicated to install?’ The honest answer is no — but the sequence matters enormously. Plan correctly, and installation is straightforward. Sequence it wrong, and you’re looking at a countertop replacement.
This guide walks through the full invisible induction cooktop installation process from initial planning to commissioning, with specific notes for American homeowners, contractors, and kitchen designers.
Before You Begin: The Critical Planning Rule
The single most important thing to understand about invisible induction installation is this: it is a countertop-phase decision, not an appliance phase decision.
In a standard kitchen renovation sequence, appliances are specified and ordered after countertops are templated. With invisible induction, the module dimensions and placement must be known before countertops are templated — because the module lives beneath the stone, and the fabricator needs to account for clearances, substrate preparation, and positioning during fabrication.
If you’re planning a full kitchen renovation, introduce invisible induction at the design stage. If your countertops are already installed, you will need to replace them to integrate this system.
What You Need Before Installation Starts
Compatible Countertop Material
Invisible induction works specifically with high-density sintered stone and porcelain surfaces. In the American market, the commonly specified compatible materials include Dekton (Cosentino), Neolith, and Lapitec, as well as select ultra-compact surface products.
Natural stone — granite, marble, quartzite — is not thermally appropriate for direct-contact cooking. Standard engineered quartz is also not recommended due to resin content and thermal sensitivity. Your fabricator should confirm material compatibility before specification is finalized.
Electrical Infrastructure
The module requires a dedicated 240V circuit, which is standard for kitchen appliances in American residential construction. If your kitchen is already set up for an electric range or a high-draw appliance, the infrastructure may already exist.
If you’re converting from gas, your electrician needs to rough in the dedicated circuit before countertops are installed — ideally during the same rough-in phase as all other kitchen electrical work.
- Circuit requirement: 240V dedicated circuit, 32A minimum (confirm specific module requirements)
- Outlet location: positioned below countertop substrate level, accessible from the cabinet interior
- Timeline: rough-in before countertop installation
Substrate Preparation
The countertop substrate — typically plywood or cement board — must be prepared to accommodate the module housing. Your kitchen fitter or installer will need the module dimensions for this. The module mounts from below and does not require any cutout in the stone surface above.
Invisible Induction Cooktop Installation: 7-Step Guide
Step 1: Finalize Placement
Work with your kitchen designer or fabricator to determine zone placement. Consider:
- Which area of the countertop or island will be the cooking zone?
- Does placement allow adequate working space on all sides?
- Is there cabinet access below for mounting and servicing?
- Where will the control interface be positioned? (Options vary by configuration.)
Placement decisions made at this stage are permanent once the countertop is installed.
Step 2: Electrical Rough-In
Your licensed electrician runs the dedicated 240V circuit to the installation location. The cable terminates below countertop level, in the cabinet interior, with sufficient slack for connection to the module. This crucial phase of the invisible induction cooktop installation happens during the kitchen rough-in stage.
In American construction, this work requires a permit and inspection in most jurisdictions. Budget for that timeline in your project schedule.
Step 3: Substrate and Fabrication Coordination
Share the module dimensions and installation drawings with your fabricator. The substrate must be prepared to accommodate the module housing during an invisible induction cooktop installation. The fabricator installs the stone countertop to conceal the invisible induction cooktop installation underneath.
Critical point: the stone itself does not have a cutout. The countertop surface above the cooking zone is continuous, uninterrupted stone. All accommodation happens in the substrate layer.
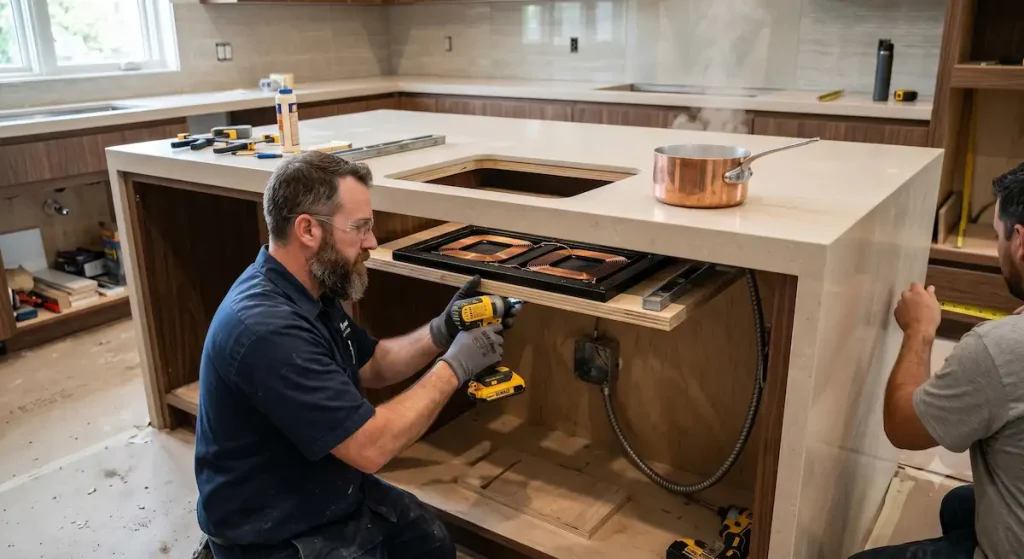
Step 4: Module Mounting
With the substrate prepared and countertops templated but before installation, the module is placed into its housing for the final invisible induction cooktop installation step. Depending on project sequence, this may happen before or after the stone is set — confirm the preferred sequence with your installation team.
A qualified kitchen fitter can complete this mounting in a few hours. The module connects to the electrical circuit in the cabinet interior.
Step 5: Countertop Installation
The fabricator installs the stone countertop in the standard manner. From above, the finished surface is completely continuous — no cutouts, no hardware, no interruption. The only visible evidence that anything is below is whatever control interface you’ve selected (typically a discreet panel on the countertop edge or cabinet face, or a wireless control option).
Step 6: Electrical Connection and Testing
Your electrician makes the final connection between the module and the dedicated circuit. The installation is powered up, zones are tested, and the system is commissioned.
Testing protocol: place an induction-compatible pan over each zone, confirm power-up and zone activation, test all power levels, confirm automatic shut-off when pan is removed, verify control interface operation.
Step 7: Countertop Surface Cure (If Applicable)
Some stone materials require a brief curing or acclimation period after installation before cooking use. Your fabricator will advise. For Dekton and Neolith, this is typically not a concern — but confirm with your specific supplier.
For Contractors and Kitchen Designers
If you’re specifying or installing invisible induction for a client, the Invisible Induction Cooktop trade program offers full specification documentation, CAD drawings, installation guides, and dedicated trade support. The team can connect you with installation specialists in your region.
Key specification parameters:
- Module dimensions for each product (download from the For Designers page)
- Substrate clearance requirements (vary by product configuration)
- Electrical specification (circuit rating, cable routing, panel access)
- Compatible surface material specifications
- Ventilation requirements for enclosed cabinet installations
→ Access trade specifications and CAD files: invisibleinductioncooktop.com/for-designers
Common Installation Questions
Can I perform an invisible induction cooktop installation in an existing kitchen without replacing countertops?
No — not without replacing the countertop. The module installs beneath the stone, which requires stone that is appropriate for induction and that has been fabricated knowing the module is below. You cannot retrofit under an existing countertop without replacing it.
Does my electrician need special training?
No. The electrical work is standard 240V circuit installation — familiar to any licensed electrician who has installed an electric range or dryer circuit. The module connection is straightforward.
What about ventilation?
The module generates modest heat in operation and requires ventilation access in the cabinet interior below. Enclosed cabinets should have ventilation provision per the installation guide. Open-frame island installations are typically unproblematic.
What is the warranty and service situation in the USA?
Confirm current warranty terms directly with the Invisible Induction Cooktop team, as these may vary by product and region. Service access is through the cabinet below — the countertop is never disturbed for maintenance.